
Windows are usually one of the most striking elements on a building and can be completely transformed depending on how they are detailed and installed. However, with the increased consciousness on thermal insulation, the detailing of windows and their installation has become progressively more complicated.
Below we will explore a typical masonry cavity wall, the different elements required to install a modern window and how these all come together on site.
Don't miss out on the opportunity to download the comprehensive Window Detailing Guide PDF complete with full CAD details from the Detail Library.
Key elements of window installation
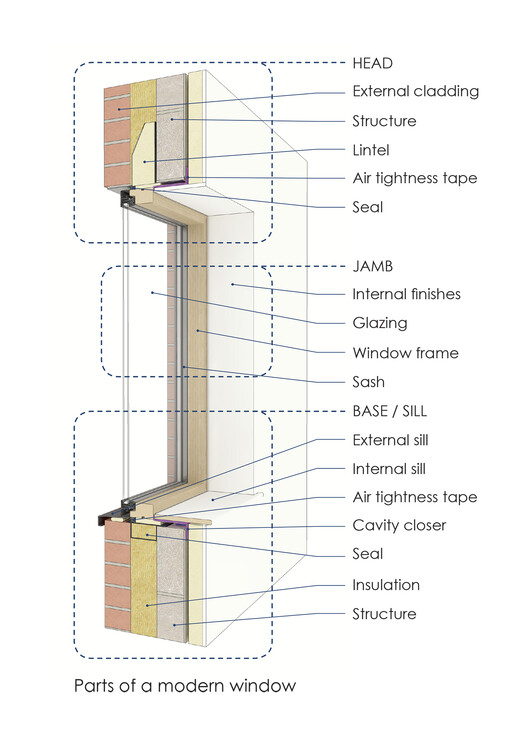
Structure: The building’s structure may help in choosing a window style and material type. We will be looking at a modern mixed aluminium and timber window installation within a masonry cavity wall. However, a timber or PVC window could also use this similar installation method.
External Sill: At the base of a window, a sill is required to help evacuate water hitting the window. It is good practice for the sill to project at least 45mm beyond the face of the wall below.
Head: At the top of an opening, the brickwork or blockwork requires support by a lintel. Steel section lintels are often used. Lintels filled with EPS insulation or thermally broken lintels further reduce thermal bridging. Concrete lintels can also be used for both the inner leaf and outer leaf of masonry, although these will be visible externally if render is not used.
Cavity closers: It is good practice to use cavity closers or DPCs backed with insulation to reduce cold bridging at the reveal. This is also a requirement to prevent the spread of fire unless the cavity is fully filled with a suitable non-combustible insulation. When constructing a typical masonry cavity construction, it is recommended to install window sets within the insulation zone. The window needs to be fixed to the structure. This is usually done through galvanised mild steel installation straps fixed back to the blockwork. These are fixed at regular intervals to secure the window to the structure whilst reducing thermal bridging.
Window construction sequence


Positioning within a wall
Some projects may require a specific external or internal reveal depth depending on the internal use or external shading required. Below is a list of typical window positioning’s and a short description of their advantages and disadvantages.
Centred

This is the most common modern positioning of a window, within the insulation zone. It creates a reveal both internally and externally for an internal sill and some shading externally.
Deep external reveal / full brick reveal

A deep external reveal is great for south facing windows as it helps to reduce solar gain. This positioning also helps to make the window opening stand out as there will be stronger shadows on the façade. This detail requires the window to be installed directly on the structure which can increase cold bridging, however this can be reduced by using structural thermal break insulation between the structure and window frame. If using a deep reveal, some designers choose to return the brick so that the reveal exposes a whole brick. A full brick reveal can only be achieved when the cavity is wider than the brick return.
Flush with external face

On facades of a building where solar gain is not an issue, such as the north face, a distinctive window position is to install it flush with the external brick face. This creates a very large internal sill, possibly for a reading or desk area. Installing a window with metal straps allows for the window to project off the structure and align flush with the external brick.


There are so many options and considerations when detailing a window. The Detail Library features over 350 construction details to download in 2D CAD and Revit and 3D SketchUp.


