
 Window flashing is an essential component of any home’s building envelope. It plays a vital role in preventing water intrusion and protecting against moisture damage. Understanding the key aspects of window flashing is crucial for homeowners to ensure the longevity and integrity of their windows and overall structural integrity. In this article, we will explore six important things homeowners should know about window flashing, including its purpose, types, proper installation, maintenance, the importance of professional installation, and compliance with building codes and regulations.
1. Purpose of Window Flashing
Window flashing serves the primary purpose of creating a watertight seal around windows. It is designed to direct water away from the window opening and prevent it from infiltrating the building envelope. By effectively sealing the window openings, flashing helps protect against moisture damage, mold growth, and structural issues that can arise from water intrusion.
2. Installation Involves Several Types of Flashing
The three main types of window flashing are drip cap, flashing tape, and sill pans, and each type is meant for different parts of a window. All are intended to properly lap the building’s overall water resistant barrier to comprise an integrate waterproofing system.
• Drip cap: Z-shaped metal drip cap is designed to fit over the top of a windowto shed water outward, preventing seepage behind the window.
• Flashing tape: This self-stick membrane comes in 4-inch and 6-inch rolls and is cut to fit along the inside edge of the rough opening (the frame constructed in the wall to hold the window). When firmly in place, flashing tape effectively prevents water from reaching the wood of the rough opening.
• Sill pan: this type of window flashing is rigid and preformed to fit the inside of the rough opening along the bottom edge. It features a slope that encourages water to drain down and out. Sill pans may be custom fabricated from sheet metal on-site or, alternatively, of preformed vinyl.
• Waterproof barrier: also called house wrap, this membrane installs over the entire outside of the wood sheathing before the siding is installed. Proper window installation depends on this member overlapping the window flashing at the top and sides, and having the flashing lap the membrane at the window sill. Housewrap comes as either asphalt-impregnated paper product or as synthetic polyethylene sheet material e.g. “Tyvek”.
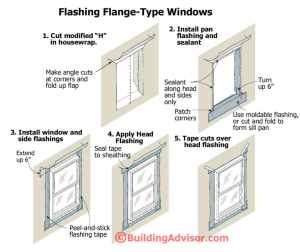
3. The Importance of Proper Installation
Most new window unitss have an integral nailing flange, either plastic or metal, that is nailed to wall to secure the window in place. The flange must be sealed to the surrounding walls and flashed to shed water. The flashing needs to be integrated properly with the house wrap and siding for the system to work properly. There are various approaches as to the best way to flash this type of window, and so most window manufacturers publish their own recommendations. Most published details follow the approach generalized here.
The key to success with any flashing detail is to follow the shingle principle, with upper layers of waterproofing materials overlapping lower layers, shedding water to the building exterior. This will continue to provide protection even if the sealant or tape fail over time as is often the case. The other key is good workmanship on the job site. In general, it’s easier to draw a tricky detail than to build it in the real world — with dirt, rain, time pressure, and workers who may not have the best training. The more fussy the detail, the greater the chance it will be messed up. This is one place where it’s worth extra supervision, inspection, or whatever it takes to get it done right.
Following the shingle principle, start at the bottom with a sill pan (membrane, metal, or plastic), install the window, then seal the top, always lapping upper flashing layers over lower ones, shingle style. For the sill, in conjunction with the rigid or moldable flashing, standard flashing tape is usually cut part way and patched into the bottom corners, a potential leak point.
Flashing tape and sealant: while peel-and-stick flashing tape will generally stick to asphalt house wrap, it’s less likely to stick to housewrap, especially if it has been exposed to the weather for weeks. It’s best to wipe off dirt, make sure the substrate is dry, and to press the flashing tape in place with a roller, as recommended by most manufacturers. Where caulk is required, choose a high-quality “sealant” approved by the manufacturer of the house wrap. Low-cost hardware store caulk will fail quickly. In the best of cases, however, you should not rely on tapes and sealants to stay stuck forever. The flashing should shed water even if the adhesives fail.
Window cap flashing. Before sealing up the top of the window, it is almost always preferable to install a traditional metal cap flashing. This helps direct water out away from window. In this type of installation, seal the cap flashing directly to the sheathing with high-quality sealant. Then place the top piece of flashing tape over the cap flashing and layer the house wrap over the tape. If you’ve added wooden trim around the window, the cap flashing goes over the wood trim. Pay attention to the ends of the cap flashing and make sure they extend slightly past the window molding.
4. Maintenance
Regular maintenance is essential to preserve the integrity of window flashing. Homeowners should inspect the flashing periodically to ensure it is in good condition. Look for any cracks, gaps, or signs of wear that could compromise its effectiveness. If any issues are detected, prompt repairs or replacements should be made to prevent water intrusion and potential damage to the window or surrounding structure.
5. Importance of Professional Installation
While some homeowners may be inclined to install window flashing themselves, it is often recommended to hire a professional for this task. Professionals have the necessary expertise and experience to ensure correct installation and minimize the risk of future water damage. They understand the intricacies of integrating flashing with the building envelope and can provide recommendations based on specific climate conditions and building requirements.
6. Building Codes and Regulations
Local building codes and regulations often stipulate specific requirements for window flashing. It is essential for homeowners to familiarize themselves with these requirements to ensure compliance during construction or window replacement projects. Adhering to these codes helps ensure that the window flashing meets the necessary standards for water resistance and protection against potential water damage.
Conclusion
Window flashing is a critical element of the building envelope that helps protect against water intrusion and maintain the integrity of windows and surrounding structures. Homeowners should understand the purpose and types of window flashing, as well as the importance of proper installation, regular maintenance, and compliance with building codes. By being knowledgeable about these aspects, homeowners can take proactive measures to safeguard their homes from water damage and ensure the longevity and performance of their windows. When in doubt, it is always advisable to consult with professionals who can provide expert guidance on window flashing installation and maintenance.
