Revit families allow you to create a parameter that controls a dimension, but Revit reacts differently depending on how you select and assign that parameter.
A common work flow process is to create the length parameter(s) in the Family Types dialog box, and then in the graphics window, highlight the desired dimension that is to be controlled by the parameter. After the dimension is selected, the user selects the desired parameter that is control the dimension.
If the length value has been input already in the parameter value in the Family Types dialog box. Revit will react a couple of different ways when selecting the parameter.
The following is a sample length parameter (Important Length) with a preset value of 2′-0″.
![]()
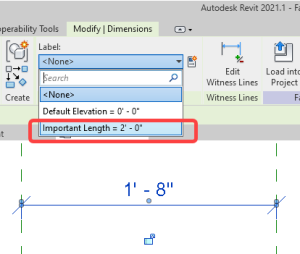
The following dimension is placed in the graphics window controlling 2 reference planes before being converted to parameter control.
Method 1
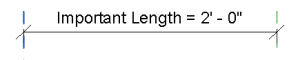
Choosing the option from the Label menu will set the value on the screen to match the parameter value.
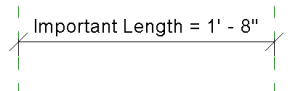
The following is the resulting dimension value:
Method 2
Choosing the desired parameter from the Properties palette will set the value on the screen to be the dimension in the graphics window and change the value in the Type dialog box.
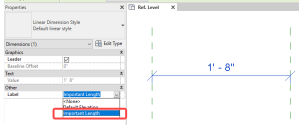
The following is the resulting dimension value.
Summary
Either option of selecting the value will ultimately work, but it is good to know that the value will be different depending on which way you select it.
