
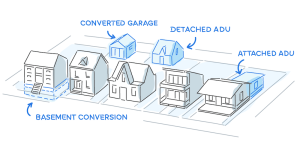
 An ADU is an additional living unit with kitchen, bathroom, and sleeping facilities in addition to those of a main residence. It may be physically attached or detached from the primary residence. Also known variously as “granny units”, “second units”, or “carriage houses”, ADU’s provide opportunity to use what may be surplus space on a residential lot to house in-laws or relatives, or to provide supplementary income to make one’s mortgage more affordable. This article outlines a general process for creating an ADU. Whether or not you will need all of the steps outlined depends on the scope of your project and the city or county area you live in. Also, please note that while the steps are presented in an order that may be useful to you, you may need to adjust the order of the steps to make it fit your particular situation.
What If My ADU Already Exists?
If you have an existing ADU that is not currently legally permitted, you may find that some of these steps may not apply to you as you go through the process of obtaining city approval and getting your ADU registered. For example, you may only find that you need to prepare a design and apply for ADU and/or building permit approval. If your ADU already conforms to the required codes and regulations, you would not have any construction work to do.
Pre-Construction/Permitting
1) Arrange Pre-Loan Approval For Your ADU: If you need to borrow money for your ADU project, you will want to consider whether you need pre-loan approval. You may need to obtain pre-loan approval from your lender. The primary purpose of the pre-loan approval is to do a check, early in the process, to see if your credit rating meets the lender’s standards for a loan, and to find out much of a loan amount you can get. Depending on when you approach the lender, you may want to take your design and your bid(s) with you.
2) Develop A Design For Your ADU: Remember, you have options for the preparation of your design. You can prepare the design yourself or have an architect prepare the design.
Decide Whether You Need Help In Designing Your ADU
Your first step is to decide who will develop your design. If you are planning to do it yourself, you will need to talk to your building officials in the area you live in to see what is required, and then decide if you have the understanding, skills, and time available to do the design. If you are planning to have a contractor design your ADU, you will want to write in a provision about this in your contract. If you are planning on using an architect for assistance, you will need a separate contract for architectural services (separate from your contract with the contractor).
Check On ADU Requirements
If you are planning to do the design yourself, make sure you first check with you local officials to see if they have any mandatory requirements that apply to your ADU design (See the ‘zoning information’ pages and the application materials for your city included in this packet). For example, at least one city does not allow detached ADUs at this time. The minimum and maximum size of ADUs allowed can vary from city to city. And, at least one city counts the square footage of a deck attached to your ADU as part of the maximum square footage in your ADU. There are a number of other areas where the regulations can be different from city to city. Know what you can and cannot do before you start designing your ADU. If you are using a contractor or architect to do the design, they will do this step.Benefits Of Starting With A Design
Beginning your process with an ADU design will help you on several levels.
• First you will get a chance to look at the proposed living space and think about what it would be like to live there from your tenants point of view (for example, is there enough storage and outlets).
• You will need a design to apply for an ADU permit.
• You will need a design when you get a bid from your contractor.
• A design may help you when you arrange pre-loan approval with your lender.
Steps For Building Permit Approval
If you are using an architect or contractor, decide if you want either of them to do this step for you, and if so, write this provision into your agreement with them. If you are planning to get the permit(s), then start with the building permit from your city or county, and ask your building officials if additional permit(s) will needed for your design. Until recently, electrical permits were issued only by the state department of labor and industries. Currently, some cities now issue the electrical permits and use their own inspectors for the electrical inspections. If your jurisdiction does not issue electrical permits, you will still need to get the electrical permit and inspections from the state department of labor and industries. Check with your local building officials about where you will need to go for electrical permits, and where to call for inspections, in the area where you live.
Building Permit Processing
When your local building department reviews your design, they will review the Drawings for conformance to the regulations. Depending on the nature of the project, the review could involve several departments. For example the Building & Safety Division will determine compliance with building, plumbing, mechanical, electrical, and energy conservation. The Fire Department will check for compliance with fire safety requirements. The Planning Division will verify compliance with zoning regulations including authorized uses within zoning districts, required parking, and property development standards such as lot coverage, building height, setback, and density requirements.
Approved Plans
When the city or county approves your design, with or without changes, the result becomes your “Approved Plans”. These are what will be used for construction. If the city or county made any changes to the design you submitted for review and approval, you will want to check with your contractor and lender to see if anything is affected by the differences:
• Check with your contractor to see if the bid will need to be modified to accommodate the changes. If so, prepare a change order for the construction contract.
• If the bid does need to be changed, check to see if you need additional loan approval from your lender.
• Make sure your construction contract refers to the final design, rather than any preliminary or earlier version of your design. If it does not, prepare a change order for the contract.
Changes To Approved Plans
If you want to make changes in the design after the regulatory agency renders permit approval:
• Check with the regulatory agency to see if you need additional review and approval of these design changes. Additional review may or may not result in project delay.
• Check with your architect to see if there would be any design issues that may need to be resolved.
•Check with your contractor to see if changes to your project bid need to be made. If so, obtain a new or revised bid.
• Check with your private and/or public lender to see if you need additional loan approval, or revised paperwork of some nature. If so, complete the required paperwork.
• Make sure your construction contract refers any revised final design, rather than an earlier design. If not, prepare a change order to the construction contract.
Construction Management
Make sure all the necessary permits are posted on the property. The permits authorize the construction work. You might also want to make photocopies of all permits, and keep these in a file with a copy of your construction contract. While the construction is underway, someone will need to manage the construction project. If you are using an architect to manage your construction project, make sure your architect services contract specifies what services you expect the architect to perform. If you are using a contractor to manage your construction project, make sure your contractor services or construction contract specifies what services you expect the contractor to perform.
Contractor Retainer
Your contractor may require a specified dollar amount or percentage of the value of your project be paid at the front end in order to start the project. If so, make sure the amount or percentage is written into your contract.
Paying Invoices
When you pay invoices, ask your contractor for the lien releases which cover them (this is your guarantee that those workers or material suppliers have been paid). If materials paid for from the invoices have warranties or guarantees, ask you contractor for these as you go. Make sure that all the labor and materials being billed for have actually been used on your project. If there is some doubt about this, ask for an explanation from your contractor. If there is still doubt and you and your contractor do not agree about whether an invoice or portion of an invoice is valid on you project, and you have a dispute resolution procedure in your contract, this would be where you use it. If you do not have this kind of procedure written into your contract, then you will need to seek advice from your legal counsel.
City Or Permit Inspections
You or your contractor will call for the appropriate permit inspections as work progresses, depending on how this duty is specified in your construction contract. Typically, when the inspectors arrive, they will inspect the work and initial or leave some other evidence of approval on or next to the permit posted on the job. If the inspection does not pass approval, they will also indicate that as well.
Change Orders
If you make changes to your project, make all your changes in writing. If you don’t have written change orders, there can be misunderstanding between you and your contractor about what changes were authorized or what the details of the proposed changes were. If a change order will modify your final design, you will need to contact your local building department to see if any additional review is required. If you are unsure, call your building official anyway. If a change order increases your budget, and you need additional funds from your lender, be sure to get approval from your lender before signing the change order.
Construction Close-Out
Make sure all the bills are paid, that you have received lien releases for the full cost of the project (for all labor and all materials). Remember, the lien releases give you the proper assurances that people and businesses who supply labor or materials to your project have been paid and won’t come back later with a lien for payment against your property. Check to see that you have received all guarantees and warranties for materials and labor, that all inspections have been made and there is documentation of their approvals, and that your city or county has completed all the final inspections for the ADU.
Final City Inspection
The regulatory agency will issue certificates of occupancy for the ADU upon final inspection. Be aware that it should be made the Contractor’s responsibility to secure this document.
Punchlist
As a final step, you will want to walk through the completed ADU with your contractor, to go over your ‘punch-list’ of items that need corrections. NOTE: before you schedule your walk through with the contractor you should make a careful walk through of your ADU after construction. Make sure all the electrical switches, outlets, fixtures and appliances work. Make sure all the plumbing fixtures, toilets and disposals (if applicable) work and that plumbing leaks are not evident. Check all interior and exterior doors for fit and proper operation. Also make sure door-stops are provided. Check all cabinet doors and drawers for smooth operation. Try to notice if there is any damage to anything or if there is any evidence of construction or installation that appears substandard to you, or if there are materials or appliances that do not meet the specifications in your plans. Make a careful list of everything you do not believe is satisfactory to you. This will be your ‘punch-list’ of items that you will discuss with the contractor on the day of the walk-through.
Retention
It is suggested that you negotiate with your contractor to include a certain amount of retention in your contract, that will be withheld from the contractor final payment, until all the contractor’s obligations have been satisfied. A typical provision might be to withhold 10% (but could be another percentage amount) of the funds until everything is completed. Once you have all the lien releases, warranties and guarantees, completed inspections, completed punch-list items, and any disputed items are resolved, this would be the time when the project was considered complete and you would normally release the retention amount to the contractor.
After Construction
Check with your lender to see if you need any additional paperwork for your loan(s). For example, you may need evidence that your ADU has received final inspection approval from your local building department.
Record The Covenant Agreement
The purpose of the covenant agreement is to certify you are the owner of the property, that you acknowledge there is an ADU on the property, and that you will comply with the city or public requirements (e.g. owner occupancy) for having an ADU. Most cities require some form of recorded covenant agreement. You will need to record the agreement in order to complete the ADU process. Having a recorded covenant also provides you the benefit that, in the future, you have evidence to show lenders (e.g. if you want to refinance or take out equity in your home) or homebuyers (e.g. when you choose to sell your home) that you have a legal ADU.
For Further Reading:
• The California Department of Housing and Community Development has published useful general information and guide resources for building an ADU in California to be found at: https://www.hcd.ca.gov/policy-research/accessorydwellingunits.shtml
• “How to Build an Accessory Dwelling Unit (ADU)” is an article by Cali-ADU to be found at: https://www.cali-adu.com/blog/how-to-build-an-adu.html
• AccessoryDwellings.org has published an article, “Getting Started” at: https://accessorydwellings.org/getting-started-2/
